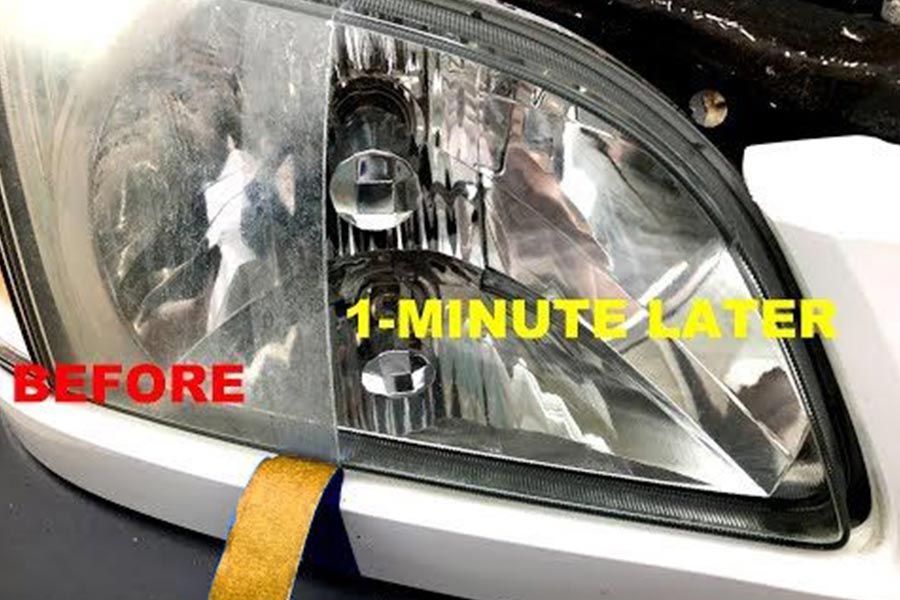
Foggy headlights can be a major hindrance. Reduced visibility not only compromises your safety but also the safety of others on the road. If you’ve noticed that your headlights have become foggy over time, don’t worry – there is a solution. Clearing up those foggy headlights not only improves their performance but also enhances the overall appearance of your vehicle. Say goodbye to dim and hazy headlights and get ready to enjoy clear and bright illumination once again.
Here Are The 3 Methods of How To Defog Headlights: A simple step-by-step guide.
Method 1: Baking Soda and Distilled Vinegar
To defog your headlights using a DIY cleaning solution, you’ll need to create a mixture of baking soda and distilled vinegar. This cleanser will effectively remove the grit and sandpaper from the lenses, leaving them clear and ready for use. Baking soda acts as a cleanser and abrasive cleaner, while vinegar helps dissolve grime on the surface. This cost-effective method utilizes common household items for auto headlight restoration, such as grit sandpaper.
Here’s how you can do it:
Create the Cleaning Solution
-
In a small bowl, combine equal parts baking soda and distilled vinegar to make a mixture. Add some grit sandpaper to the mixture.
-
Use the grit sandpaper to sand down any rough areas on the car. Then, stir the mixture until it forms a paste-like consistency. If you have any questions, feel free to reply to this post.
Clean the Headlights
- Use a clean cloth or paper towel to apply the baking soda and vinegar mixture onto the foggy headlights.
- Gently rub the car mixture onto the car headlights in circular motions, focusing on car areas with heavy buildup.
- Let the mixture sit on the headlights for about 5-10 minutes to allow it to penetrate and break down any stubborn dirt or grime. This is an important step in the cleaning process.
- Afterward, the first step is to use a clean cloth or paper towel dampened with water to wipe away the mixture from the headlights.
- If there are still remnants of haze or residue, repeat the step until your headlights are clear.
Additional Tips
-
Before applying the cleaning solution, make sure to remove any loose dirt or dust from your headlights by wiping them with a dry cloth.
-
For tougher cases of haze or oxidation, the first step you may consider is lightly sanding the headlights before applying the baking soda and vinegar mixture.
-
After cleaning your headlights, the next step is to further enhance their clarity by using rubbing alcohol to remove any remaining grit or grime.
Remember that regular maintenance is key to preventing future fogging of your headlights. By following this simple DIY method using baking soda and distilled vinegar, you can restore your foggy headlights without breaking the bank.
Method 2: Toothpaste and Other Recommended Products
Toothpaste isn’t just for brushing your teeth! It turns out that toothpaste can also help defog your headlights. The mild abrasives in toothpaste work wonders in removing surface grime from your headlights, restoring their clarity. But toothpaste isn’t the only product you can use to tackle foggy headlights. There are other recommended products specifically designed for headlight restoration.
If you’re looking for an alternative method that utilizes toothpaste, here’s what you can do:
-
Gather the necessary materials: toothpaste (preferably non-gel), soap, water, soft cloth, and a towel.
-
Start by cleaning the headlights with soap and water to remove any loose dirt or debris.
-
Apply a small amount of toothpaste to a soft cloth and rub it onto the headlight using circular motions.
-
Continue rubbing until you notice the foggy coating starting to fade away.
-
Rinse off the toothpaste residue with water and dry the headlights with a clean towel.
But which toothpaste brand should you use? Some popular options include Colgate, Crest, and Arm & Hammer. Experiment with different brands to find one that works best for your headlights.
If you prefer a more comprehensive approach, there are headlight restoration kits available on the market that come with everything you need – from sandpaper to UV sealant – to restore your foggy headlights effectively.
Remember, regardless of whether you choose toothpaste or a dedicated restoration kit, it’s important to follow the instructions provided carefully. Taking shortcuts or skipping steps may result in subpar results.
So grab that tube of toothpaste or invest in a quality headlight restoration kit – either way, you’ll be well on your way to clear and bright headlights!
How to defog it from Toothpaste in detail step by step?
Restoration Kit
On the market, there are a number of Defogging Kits using various techniques. Before ordering, make sure you read the instructions carefully to ensure you are familiar with the process. The most notable brands on the market right now
- 3M Brand Headlight Restoration Kit
- Sylvania Headlight Restoration Kit
- Turtle Wax T-240KT Headlight Restorer Kit
How to defog it from restoration kit?
Step One-
Unbox your kit and make sure that everything is accounted for. Now gather all your other materials that you will need. I used a corded 18v drill and 2in. painters tape and a towel to catch the drips on the floor.
Step Two-
Next pop your hood and prop it up so you have access to the top of the head lights. Now you need to mask off all the areas around the head lights, even the plastic grill for those who have a Z71 as I do. This is very important because it prevents you from losing texture on your grill and taking wax and gloss coats off the paint. The Colorado’s/ Canyons have space all around the headlight except near the reflectors. You can hold the tape taught and carefully slip the tape underneath and around the headlight. Make sure to get the cracks on the hood and next to the grill.
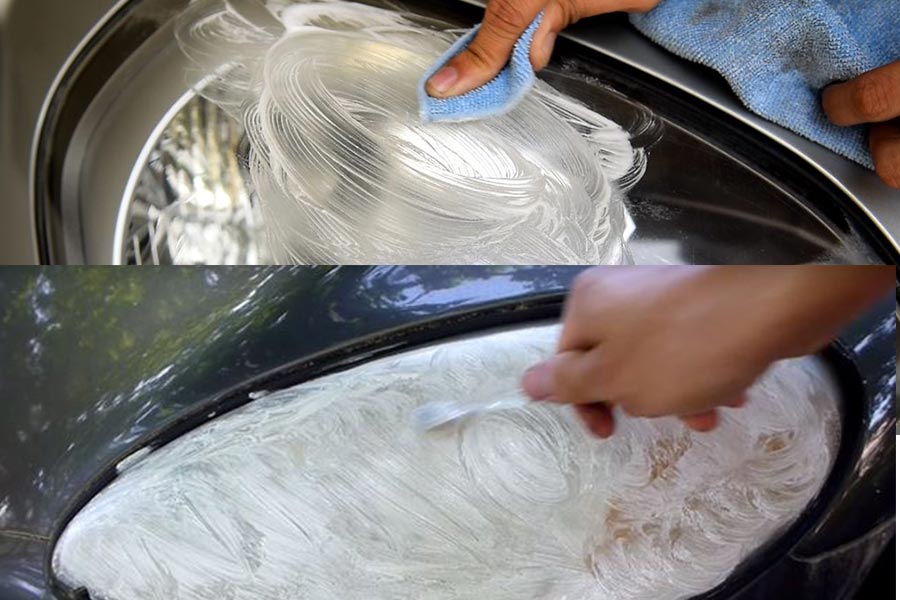
Method 3: Dish Soap for Headlight Restoration
Dish soap is a fantastic option for cleaning foggy headlights. It’s gentle yet effective, making it a popular choice among car enthusiasts. By combining dish soap with water, you can easily remove the haze from your lenses and restore them to their former glory.
To use dish soap for headlight restoration, follow these simple steps:
-
Start by mixing a small amount of dish soap with water in a bucket or container. The ratio should be about one tablespoon of dish soap per gallon of water.
-
Dip a clean microfiber cloth into the soapy water mixture and wring out any excess liquid.
-
Gently scrub the headlights using circular motions, applying some elbow grease to remove the foggy buildup.
-
Rinse the headlights thoroughly with clean water to remove any remaining soap residue.
-
Dry the headlights using a separate microfiber cloth to prevent water spots.
Using dish soap in this way can effectively clear up your cloudy headlights and improve visibility while driving at night. It’s an affordable and easy-to-use method that yields impressive results.
Remember,Consistency is key! Regularly cleaning your headlights with dish soap can help prevent fogging and extend their lifespan.
So why spend money on expensive products when you can achieve excellent results with just some good old-fashioned dish soap? Give it a try and see the difference it makes!
Quick Fixes and Headlight Restorer Options
Take advantage of quick fixes to temporarily improve headlight clarity.
If you’re looking for a quick fix to improve the clarity of your headlights, there are a few options you can try. One popular method is toothpaste. Yes, you heard that right! Toothpaste contains mild abrasives that can help remove the haze and yellowing from your headlights. Simply apply a small amount of toothpaste to a clean cloth and gently rub it onto the surface of your headlights in circular motions. Rinse off the toothpaste with water and dry the headlights thoroughly. This method may provide temporary improvement, but keep in mind that it might not be a long-lasting solution.
Another quick fix option is using bug spray or insect repellent. These products contain chemicals like DEET or alcohol, which can help dissolve dirt and grime on your headlights. Spray some bug spray or insect repellent onto a clean cloth and wipe it onto the surface of your headlights. Again, rinse off with water and dry thoroughly.
Explore various headlight restorer options available in the market.
If you’re looking for more long-lasting results, consider investing in a headlight restoration kit or specialized headlight cleanser. These products are specifically designed to remove oxidation, haze, and yellowing from headlights, restoring them to their original clarity. Most kits come with detailed instructions on how to use them effectively.
Some popular headlight restoration kits include those from Meguiar’s, 3M, and Turtle Wax. These kits usually consist of sandpaper or abrasive pads for removing the outer layer of oxidation, followed by polishing compounds to bring back the shine.
Find out about products that provide long-lasting results for headlight restoration.
When choosing a headlight restorer product, look for one that offers long-lasting results. Some products claim to provide protection against future damage by applying a protective coating over the headlights. These coatings can help prevent oxidation and yellowing, keeping your headlights clear for a longer time.
Learn how to maintain clear headlights using quick fixes and specialized restorers.
To maintain clear headlights, it’s essential to regularly clean them and protect them from further damage. Here are some tips:
-
Clean your headlights with mild soap and water regularly.
-
Apply a UV-resistant coating or wax to protect the headlights from sun damage.
-
Avoid using harsh chemicals or abrasive materials that can scratch the surface of the headlights.
By following these maintenance tips and utilizing quick fixes or specialized headlight restorers when needed, you can keep your headlights clear and improve visibility on the road.
Clearing Up Headlights: Tips and Tricks from r/howto
In the world of headlight restoration, there’s always something new to learn. That’s why it’s great to turn to online communities like r/howto on Reddit, where experienced individuals share their valuable tips and tricks for defogging headlights. Here are some innovative methods and techniques that have been proven effective by the community:
Discover Valuable Tips and Tricks
- Members of r/howto have successfully defogged their headlights using a variety of methods.
- Some recommend using toothpaste as a DIY solution, while others swear by using baking soda or vinegar.
- Another popular technique involves using sandpaper or a polishing compound to remove the foggy layer.
Learn from Experienced Individuals
- By reading through the discussions on r/howto, you can gain insights from those who have already tackled headlight restoration projects.
- They often provide step-by-step instructions and share their personal experiences with different methods.
- This firsthand knowledge can help you avoid common pitfalls and achieve better results.
Find Innovative Methods for Clearing Up Foggy Headlights
- The Reddit community is known for its creativity, so you’ll find some unique approaches to clearing up foggy headlights.
- For example, some users suggest using a hairdryer or heat gun to evaporate the moisture inside the headlights.
- Others recommend applying a clear coat or UV-resistant sealant after cleaning to prevent future fogging.
Gain Insights into Common Challenges
- Restoring headlights isn’t always straightforward, and there are common challenges that many people face.
- One issue is yellowing or discoloration caused by oxidation over time.
- Members of r/howto often discuss ways to address this problem, such as using specialized restoration kits or seeking professional help.
By tapping into the collective wisdom of the Reddit community on r/howto, you can discover valuable tips, learn from experienced individuals, find innovative methods, and gain insights into common challenges.
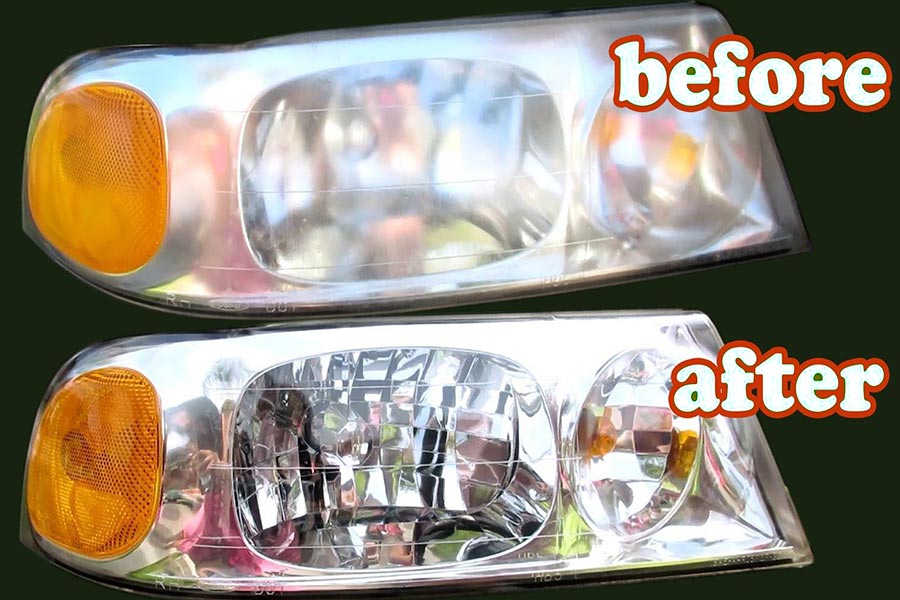
Achieving Clear, Defogged Headlights
Congratulations! You are now equipped with a comprehensive guide to defogging your headlights and restoring their clarity. By following the step-by-step methods outlined in this blog post, you can bring back the shine to your foggy headlights and improve your visibility on the road.
Now that you know how to tackle this common issue, it’s time to take action. Don’t let foggy headlights hinder your driving experience any longer. Grab the necessary supplies and get started on rejuvenating your headlights today. Remember, clear headlights not only enhance your safety but also give your vehicle a fresh, well-maintained appearance.
FAQs about Defogging Headlights
How often should I clean my headlights?
It is recommended to clean your headlights at least once every three months or whenever you notice a decrease in their brightness. Regular maintenance will help prevent severe fogging and ensure optimal visibility while driving.
Can I use household cleaning products instead of specialized headlight cleaners?
While some household products like toothpaste or baking soda can be effective for mild fogging, specialized headlight cleaners are designed specifically for this purpose and provide better results. They contain ingredients that effectively remove oxidation and restore clarity without causing damage to the headlight surface.
Will defogging my headlights improve their performance at night?
Yes! The process of defogging removes built-up grime and oxidation from the headlight lens, allowing more light to pass through. This results in improved visibility during nighttime driving and enhances overall safety on the road.
Are there any preventive measures I can take to avoid future fogging?
To prevent future fogging of your headlights, consider applying a protective coating after cleaning them. These coatings act as a barrier against UV rays and other environmental factors that cause oxidation. Parking in shaded areas or using car covers can help minimize exposure to sunlight and prolong the clarity of your headlights.
Can I use a hairdryer to speed up the drying process after cleaning?
While using a hairdryer may seem like a convenient way to speed up the drying process, it is not recommended. High heat can damage the headlight lens or even cause it to crack. It’s best to allow the headlights to air dry naturally or use a soft cloth to gently pat them dry.
You Might Interested:
- How To Fix Bubbling Paint On Car
- How to Remove Coffee Stains from Car Seats
- Best Vinyl Protectant For Cars
About The Author
Ibrar Ayyub
I am an experienced technical writer holding a Master's degree in computer science from BZU Multan, Pakistan University. With a background spanning various industries, particularly in home automation and engineering, I have honed my skills in crafting clear and concise content. Proficient in leveraging infographics and diagrams, I strive to simplify complex concepts for readers. My strength lies in thorough research and presenting information in a structured and logical format.
Follow Us:LinkedinTwitter